

My wonderful friend Dankia got married recently and she asked my to make her wedding cake. I had a lot of fun making it and I wanted to show you all how I managed to pull it off. {Side note: do not under any circumstances make a friend’s wedding cake unless you are a professional, your friend is very laid back, or you like seeing brides cry.}
She sent me a recipe that she had previously made for her Fiancée’s birthday and wanted something similar. The cake was to be 2 tiers {each layer is called a tier} and be masked with buttercream and poured with chocolate ganache. The recipe she sent me was quite a light a fluffy chiffon style cake so I adapted it to hold the weight of 2 layers of cake per tier plus icing, ganache, and toppings.
Let’s start with the cake recipe:
Chocolate Cake
2 cups cake flour
2 cups white granulated sugar
3/4 of a cup unsweetened cocoa powder {Buy the good, true cocoa powder, not the no-name stuff. This is one ingredient that makes a big difference depending on quality}
2 teaspoons baking powder
1½ teaspoons baking soda
1 pinch salt
1 pinch cracked black pepper
1 cup milk {when baking feel free to use expired milk, it will not make the cake bad, in fact a little sour makes for a better product. We always keep old milk in the fridge and just label it “NFG” of it is for only baking. NFG stands for no f&$%ing good.}
½ cup canola oil
2 large eggs
1 teaspoon vanilla extract
1 cup boiling water {Or less, just be ready with 1 cup}
I mixed the batter in my kitchenaid mixer but you could use just a bowl, whisk and a strong arm.
Mix the dry ingredients together and stir with a fork or whisk to fully incorporate.
Slowly add the wet ingredients {except the water} and pre-beat the eggs a bit so they are not in large blobs still. The batter will look smooth at this point. Next SLOWLY add the boiling water. If you add it too quickly you will have scalding chocolate water all over your kitchen. *If the batter looks too runny do not add all of this water.
Then put your mixer on high and give it a good fast mix before pouring into pans. Bake for 35-40 minutes for a 10″ and 30-25 minutes for a 7″ at 355 F.
I used this recipe to make one 10″ layer, or two 7″ layers. I made 3 batches in total, two layers for each tier.

Next I made buttercream.
Swiss Meringue Buttercream
10 egg whites {This will not work if you get the yolk in the mix}
2 cups of white granulated sugar
2 lb of Butter
1 vanilla bean
Cut the butter in to small 1″ x 1″ squares and let it get nice and warm. Take all of the egg whites and the sugar and put them in a stainless steel or glass bowl over a pot of simmering water on the stove. Whip it up with your hand whisk and make sure it never sits still. Do not let the water below get to a full boil. {Now some people are picky at this stage and make sure the whites get to 160°F to pasteurize it. I have done it enough times I just go by feel not temp.} When the sugar has all dissolved {Or you are at 160°F} pull the bowl off the pot and put it in the mixer {I do this right in my kitchenad bowl so I do not have to transfer} and whip it at medium speed until soft peaks appear. Some recipes say stiff peaks and.. that is a lie! It will ruin your buttercream, and your dreams. When you get soft peaks slowly add your butter one cube at a time. This takes fooooooooooooooooorever. Suffer through friends. It’s worth it. Go too fast or have too cold of butter and it will split, and you will cry. {If you DO split it, just leave the mixer on, and walk away. Drink a beer, smoke a cigar, take a walk, do some yoga; whatever your poison. It will come back together but it needs time and to not be watched.} True story.

Next step, raspberry filling. I do not really have a recipe for this. I just cooked down the beautiful fresh raspberries I picked with a bit of sugar and a vanilla bean.


I stacked two of each size on top of each other with a large squishy layer of raspberry in the middle. Be sure not to let it seep out of the sides if you want the buttercream to look nice on the outside.

Next step. Masking the cakes.{This means making a beautiful smooth layer on the outside of the cakes} Now this is the step where I am no expert. My sister Jo Faye is an amazing pastry chef and I am very glad she was not there to witness my substandard skills at work. The trick with masking is dipping your palate knife in hot water, and having skills.

But thankfully this cake had a very woodland fairy vibe and did not need to be perfect.

Before I went on to the ganache stage I put my supports in my bottom layer to hold the whole thing together. I had both layers on a cake board exactly the size of each cake with no overhang. On the bottom layer I put 9 straws {bubble tea straws work the best but I only had skinny ones so I did bundles of 3}. The point of the straws is to distribute the weight of the top cake {on a cake board} over 3 spots of straws rather than just letting the bottom layer hold it. If you just plop the top layer on, within hours your cake will slupm into itself and look awful. {Sorry, the truth hurts}.

Then I went on to ganache. I used nice dark bitter-sweet chocolate.
Chocolate ganache
9 oz bitter-sweet chocolate
1 cup 35% cream
1 teaspoon powdered gelatin
Chop the chocolate in to small pieces and place in a bowl. Put the cream and gelatin on the stove and bring to a quick boil. Pull it off the stove as soon as it boils so you do not over-cook it. Pour over the chopped chocolate and mix. Stir it until it is a smooth consistency and then let it cool until it covers the back of a spoon and just barely drips. Then I poured it over the top of each tier and smoothed it to the sides so it just dripped to get the “dripping effect”.


Then we stacked the cakes. I usually have nerves of steel, but stacking a heavy ass cake you just spent the last 4 hours making is terrifying. Thank goodness James was there to help. All went well.

The only thing left to do was deliver it to the reception and decorate it with fresh flowers.
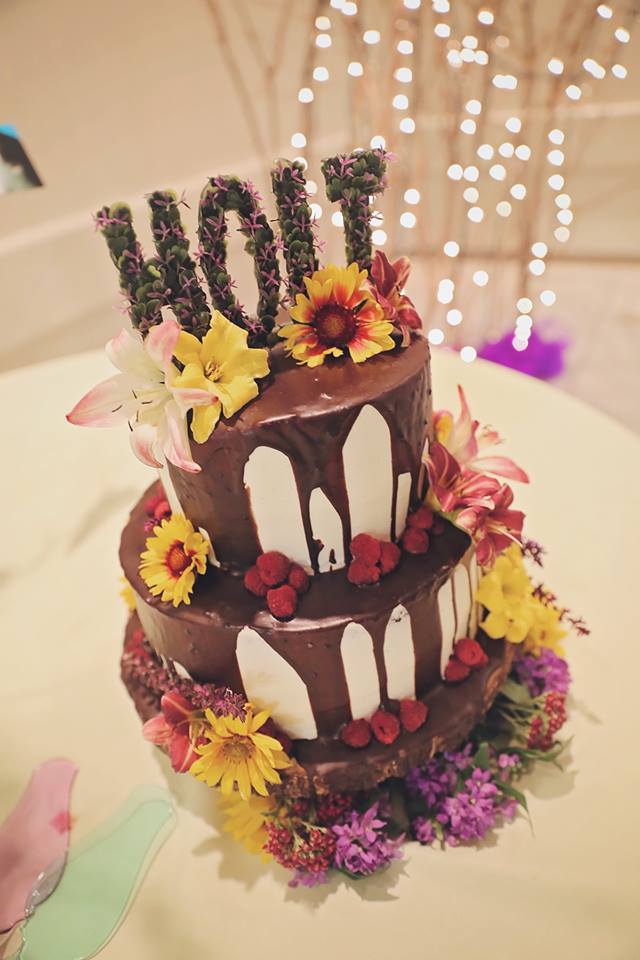

I think it turned out pretty dang nice. And my beautiful friend got married, and I’m pretty sure that’s the point of weddings right?!

Congrats Dani and Gareth!
– Stephanie
Check me out on Instagram @cultivating_foodies
Reblogged this on Chef james parker.
Reblogged this on Chef james parker.